We've had interesting weather this year, to say the least. I don't consider it normal for the tulips to bloom in March in Kansas, but what can you do. . .
This year, we picked/are picking dandelion greens. Great-grandmas everywhere would be proud. The arguments against dandelions as food have become long and loud with recent generations.
"Are you crazy???"
"But aren't they bitter?"
"They're weeds, pitch 'em!"
"Are you sure that's safe to eat?"
So in answer to the multitude of questions and arguments, yes, I'm clearly crazy, but that's another post. Dandelions are known to be a bitter herb, but that's actually a GOOD thing. Our ancestors understood the importance of bitters to cleanse the body of toxins and transition it from heavy winter foods to the fresh spring and summer foods. Yes, in the day of the perfect lawn, dandelions are considered "weeds" or unwanted trespassers, but they are oh so useful, and if you don't spray chemicals on your lawn and garden, they are absolutely safe! If you do spray your yard, you can and should pick these useful weeds up at a premium at your local health food store.
There are ways to reduce the bitterness of dandelions:
1. Pick them very young, before the plant has a chance to flower
2. Wilt or blanch them and allow some of the bitterness to drain out
3. Serve them with just a hint of sweet to offset the bitterness that's left
Shame on me for not taking more pictures, but here's what we did with our bumper dandelion crop this spring:
Wilted Dandelion Salad with Sunchokes and Bacon
(served 8)
3-4 cups fresh, young dandelion greens
4 slices bacon
1/2 lb sunchokes (jerusalem artichokes)
sprig chives or green onions
3 Tbsp vinegar (we used a combo of apple cider and balsamic)
1 Tbsp brown sugar or honey
dash of garlic salt
edible spring flowers (opt garnish - we used redbud and violet blossoms)
Thoroughly wash dandelion greens and set aside in colander to drain. Snip chives into 1/2" lengths. Cut bacon into small pieces and cook until crisp. Reserve 2 Tbsp of the oil. Thoroughly wash sunchokes and slice into bite size pieces. Whisk reserved oil, brown sugar, and vinegar together with garlic salt and black pepper to taste, add mixture to bacon pan along with sunchokes. Warm the sunchokes and liquid, then pour hot liquid over dandelion greens. gently stir greens to wilt them evenly. Toss wilted greens with bacon bits and chives. Serve with edible spring flowers as garnish.
Remarkably, the kids devoured this dish. I'll definitely be making it again this spring.
Dandelions are so full of nutrients, that we'd like to be able to take advantage of them all year long. I started planning for that today while I was out weeding the garden beds. Every dandelion plant that hadn't bloomed yet, was pulled and set aside for the kitchen. The plants that had bloomed went in the compost pile. There were plenty of both!
Once I brought my treasure inside, I thoroughly washed the dandelion greens and let them plump up on cold water while I made dinner. The nice, plump greens were rinsed one more time then cut into two inch long pieces, blanched for about 45 seconds, and plunged into ice water. Once cooled, I squeezed most of the moisture out of the greens and formed them into tight, handball sized balls and put them in the freezer to solidify. Later, I'll move the dandelion balls into a freezer bag. As we make soups and stews this coming year, we'll throw a ball or two of dandelion greens into the pot for a splash of color and nutrition. Thanks to my best buddy HeatherAnne for the green balls idea. She taught me to do it with kale and other garden greens when we started gardening together, and it's just perfect for the dandelions too.
And remember, kids.... Don't spray your yard! Don't throw those things out! Eat your spring greens! And cheers to our useful backyard friend, the dandelion!
Sunday, March 25, 2012
Saturday, January 21, 2012
A Curry A Day
My Bestie is in Hawaii, hopefully having a glorious time in the sunshine. When her husband asked us if we could get all of the kids together this weekend for a play date (and so he could have some adult conversation), of course the answer was a resounding, "Yes!"
 So today rolled around, and I honestly hadn't given a lot of thought to what we were going to do, or to eat. Also, suddenly, each of our kids had a friend coming over. All around dinner time. With 5 teenagers already in the house, that's a LOT of mouths. I poked around the house to see what we have handy, and I have to say, I wasn't encouraged. Moments like these almost always call for one of my favorite and most versatile meals - curry.
We had a beautiful pork roast from the pig my parents gave us for Christmas. Kira was able to scrounge some greens and a quart of tomatoes from the deep freeze, and I always have bulk Indian spices in the house. Here's what we came up with:
Pork Scrounge Curry
(serves 8-12)
1 Tbsp olive oil
4 cloves
8 black peppercorns
2 1/2 -3 lb pork roast, cubed
1 tsp ground turmeric
3 tsp chili powder
3 tsp crushed coriander seeds
2 inch piece of cinnamon stick
1/2 tsp garlic salt
1 bag frozen stew veggies
2 c frozen greens (collards, kale, spinach, or cruciferous greens)
1 qt water or tomato juice
1 qt frozen or canned chopped tomatoes
4 cup cooked lentils
steamed brown rice
Heat oil in large pan. Lower heat and add cloves, peppercorns, baby onions, and celery (from frozen stew veggies. Fry for about 5 minutes or until the baby onions are lightly browned and celery has softened. Add the cubed pork, turmeric, chili powder, coriander seeds, and garlic salt, and stir fry for about 5 minutes or until meat is seared on all sides.
Pour in wate r or tomato juice, greens, and remaining frozen veggies. Cook on medium heat for about 30 minutes while your lentils and rice are cooking.
Lightly mash the cooked lentils to release some of the starch. Stir mashed lentils into the curry, and cook on medium until the curry reduces and thickens. The final consistency should be stew-like.
Serve over steamed rice.
 So today rolled around, and I honestly hadn't given a lot of thought to what we were going to do, or to eat. Also, suddenly, each of our kids had a friend coming over. All around dinner time. With 5 teenagers already in the house, that's a LOT of mouths. I poked around the house to see what we have handy, and I have to say, I wasn't encouraged. Moments like these almost always call for one of my favorite and most versatile meals - curry.
We had a beautiful pork roast from the pig my parents gave us for Christmas. Kira was able to scrounge some greens and a quart of tomatoes from the deep freeze, and I always have bulk Indian spices in the house. Here's what we came up with:
Pork Scrounge Curry
(serves 8-12)
1 Tbsp olive oil
4 cloves
8 black peppercorns
2 1/2 -3 lb pork roast, cubed
1 tsp ground turmeric
3 tsp chili powder
3 tsp crushed coriander seeds
2 inch piece of cinnamon stick
1/2 tsp garlic salt
1 bag frozen stew veggies
2 c frozen greens (collards, kale, spinach, or cruciferous greens)
1 qt water or tomato juice
1 qt frozen or canned chopped tomatoes
4 cup cooked lentils
steamed brown rice
Heat oil in large pan. Lower heat and add cloves, peppercorns, baby onions, and celery (from frozen stew veggies. Fry for about 5 minutes or until the baby onions are lightly browned and celery has softened. Add the cubed pork, turmeric, chili powder, coriander seeds, and garlic salt, and stir fry for about 5 minutes or until meat is seared on all sides.
Pour in wate
 r or tomato juice, greens, and remaining frozen veggies. Cook on medium heat for about 30 minutes while your lentils and rice are cooking.
Lightly mash the cooked lentils to release some of the starch. Stir mashed lentils into the curry, and cook on medium until the curry reduces and thickens. The final consistency should be stew-like.
Serve over steamed rice.
Friday, January 6, 2012
On Becoming...
I am not the person I was a year ago. I look at me a year ago and don't recognize that person. Of course, looks barely scratch the surface, but they are an indicator of the journey. That's me, on the left.
 In 2011, Chris and I let go of a business that wasn't moving our family forward, and took a chance on another business that could, if we would just grow with it. I really hoped that the saying "no pain, no gain" would apply, because it was VERY painful emotionally and financially.
My husband and I challenged each other to develop better health habits. He lost 35 pounds. I lost 45! We had (and needed) a lot of help. We found Herbalife and fell in love with the products, which led us to the business opportunity. We fell in love with the coaches and with the business itself, and jumped in with both feet.
One of the most important things I fell in love with was the philosophy: Train, train, train... 1% better EVERY DAY... BECOME your DREAM! Chris and I started working on ourselves, and will continue for the rest of our lives. We train with the best leaders in our business, we build relationships with mentors, we choose what we watch on TV and read in books carefully. We YouTube the leaders we want to emulate, and we tell ourselves every day the important things we should remember about who we are:
 Chris and I have drastically improved how we communicate with each other and the kids. Together we have all improved the state of our home. We've improved ourselves, inside and out.
For the first time in years, we weren't scrambling to pay the utilities and feed the family at the end of the year. Despite closing one business and investing in another, we made it through the end of 2011 without worrying how much longer we could put off the creditors. Again, we had a LOT of help, but we DID it! Learning to accept help without giving up or deciding that we were permanent failures was a huge growth step in our journey this year.
I know that we are just beginning on our journey, but what better time to start than now? So much can change in a year if you want it, believe it's there for you, and really go for it! Here's to a new year of Becoming...
 In 2011, Chris and I let go of a business that wasn't moving our family forward, and took a chance on another business that could, if we would just grow with it. I really hoped that the saying "no pain, no gain" would apply, because it was VERY painful emotionally and financially.
My husband and I challenged each other to develop better health habits. He lost 35 pounds. I lost 45! We had (and needed) a lot of help. We found Herbalife and fell in love with the products, which led us to the business opportunity. We fell in love with the coaches and with the business itself, and jumped in with both feet.
One of the most important things I fell in love with was the philosophy: Train, train, train... 1% better EVERY DAY... BECOME your DREAM! Chris and I started working on ourselves, and will continue for the rest of our lives. We train with the best leaders in our business, we build relationships with mentors, we choose what we watch on TV and read in books carefully. We YouTube the leaders we want to emulate, and we tell ourselves every day the important things we should remember about who we are:
- I am a good Mom
- I am a good Wife
- I love my children
- My family cares about me and our home
- My children want to do what's right
- I am generous
- I am beautiful
- I am healthy
- I have great wealth. . .
 Chris and I have drastically improved how we communicate with each other and the kids. Together we have all improved the state of our home. We've improved ourselves, inside and out.
For the first time in years, we weren't scrambling to pay the utilities and feed the family at the end of the year. Despite closing one business and investing in another, we made it through the end of 2011 without worrying how much longer we could put off the creditors. Again, we had a LOT of help, but we DID it! Learning to accept help without giving up or deciding that we were permanent failures was a huge growth step in our journey this year.
I know that we are just beginning on our journey, but what better time to start than now? So much can change in a year if you want it, believe it's there for you, and really go for it! Here's to a new year of Becoming...
Tuesday, December 20, 2011
Is There a Chef in the House???
I mentioned in my last post that we were having a family tree trimming party on Saturday. For us, this means pulling out the stops, making a finger food feast, and nibbling, caroling, decorating, and watching movies late into the evening. This year, Chris and I had an all day Herbalife training before our family party. We learn in Herbalife that everything is "No Problem." With my daughter Kira in the house, that was absolutely true!
Chris and I bought in bags and bags of supplies, and Friday night, Kira and I made a list of all of the things she was going to make for our feast. The list goes as follows:
 There were only a few things that were more elaborate than slicing, dicing, or arranging on a tray, but what REALLY impressed me were Kira's hors d'oeuvres. She made both conventional and gluten free versions. Her ingredient list included crackers, neufchatel cheese, green and black olives, mini sweet peppers, and smoked oysters.
 I suppose a little background is in order. Kira is a 15 year old budding chef. She's one of the youngest students in our
  district to make it into the culinary arts program offered for future chefs and restaurant managers. She even takes extra night classes one night a week and works in the district's student restaurant another night. Pretty dedicated, eh?
Chris and I came home from our training starving, but our oldest wasn't going to be able to join us for a couple more hours. I think we drove Kira to distraction snitching from her trays. As soon as the oldest walked in the door, the holiday music went on, the plates were passed, and the party started for real. Kira can cater our parties ANY TIME!


Wednesday, December 14, 2011
It's a Snap!
I love this time of year... the parties, the lights, and the FOOD! Last week, I realized that I needed to make goodies for a dear co-worker's birthday, our company goody day, AND my family's tree trimming party. With that in mind, we had a whirlwind night of kitchen activity, starting with supper. My wonderful husband Chris got things started for me while I was still at work. I don't know what I would have done without him!
Chips in the Head
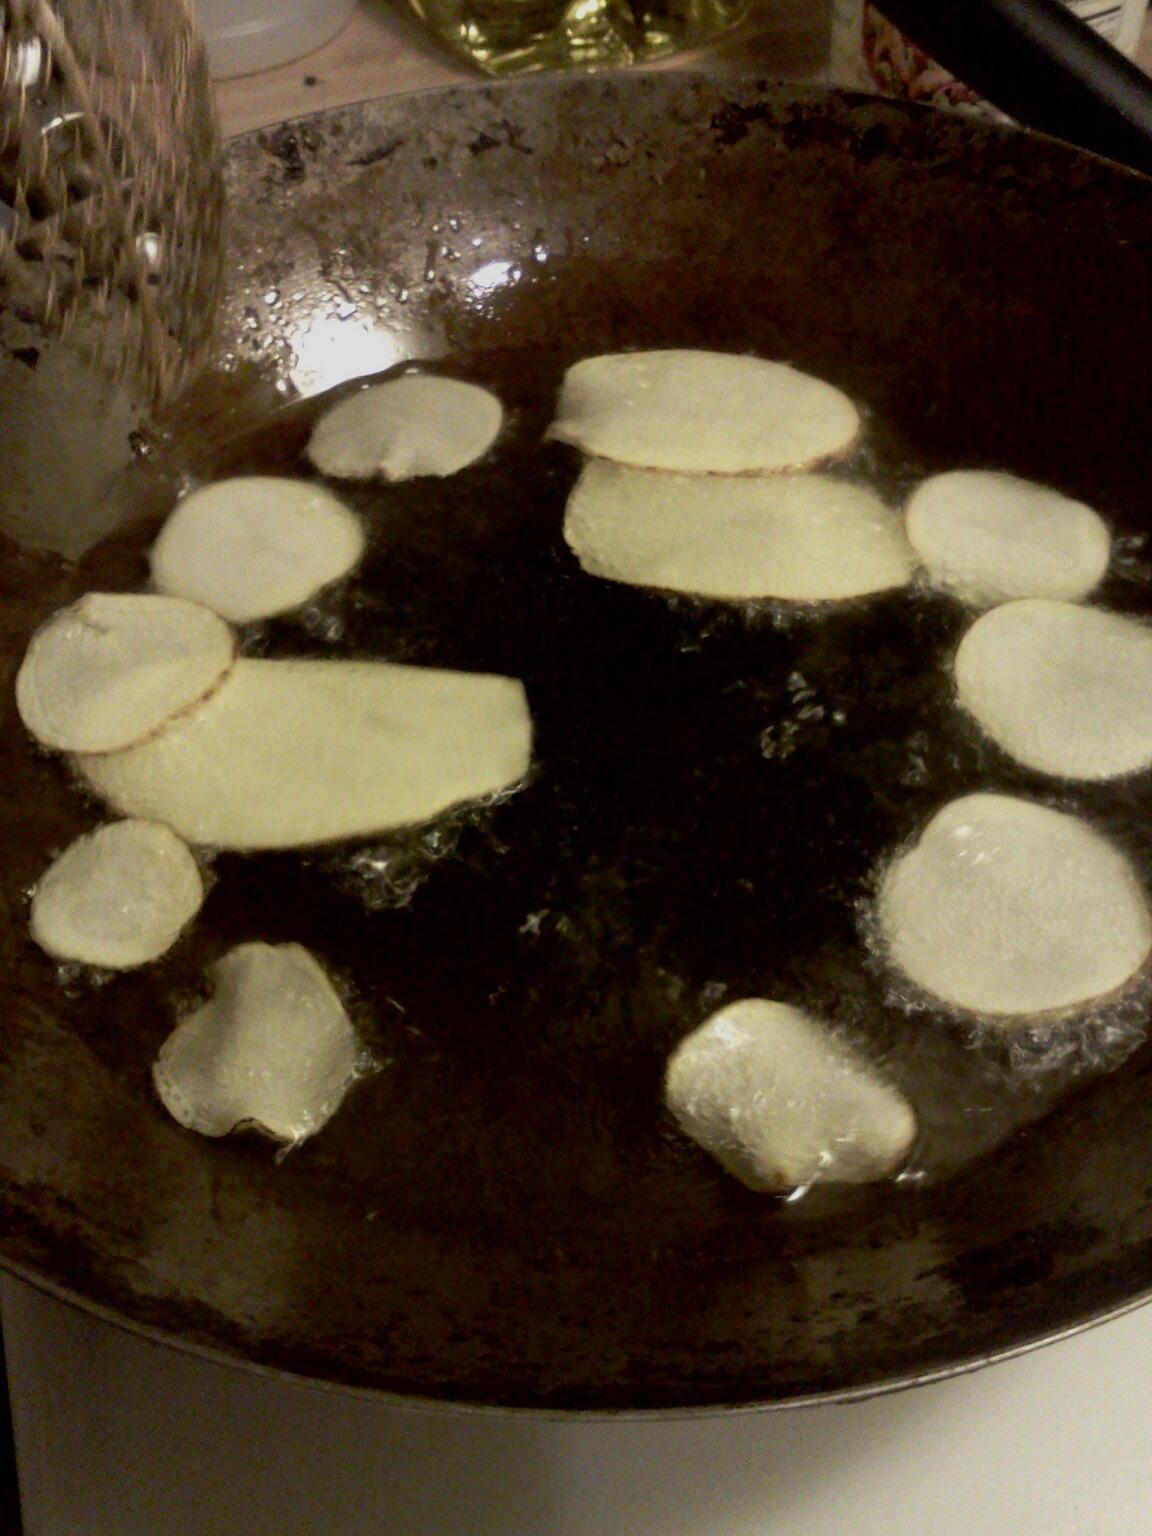
I had really been craving potato chips for weeks, but in the spirit of teaching the kids healthy choices, we seldom buy them. It turned out we had a few lonely potatoes, so I decided to go ahead and feed my craving while having and adventure with the kids. Homemade potato chips, here we come! Chris seasoned chicken legs and thighs and baked them in the oven at 350 degrees for about an hour and a half. While the chicken was baking, he prepped potatoes for me by washing them thoroughly and using my daughter's mandolin to very thinly slice the potatoes. The sliced potatoes went into a big bowl of water to prevent browning. I understand that it leaches some of the nutrients from the potatoes, but it was worth it for the pretty color on this rare treat.
He didn't feel like he was having good success with the finest setting on the mandolin, so he used the next step up. I would say use the finest setting even if some of the slices shred. The thicker they are, the faster they get soggy.
The next step was heating the oil. We used what we had in the house, which was a combination of best blend, canola, and olive oils. You need at least two inches of oil so the slices have room to move around.
When you add the potato slices, the oil fizzes way up, so don't use a pan that you have to fill too full or you'll have a mess on your hands. The slices will curl up on the edges, but they won't be really crispy until they turn golden brown. We did not use any kind of chemicals to keep the chips "white" during frying, so ours were very golden.
Toss the still hot chips with whatever seasoning you prefer and set them aside to cool in single layer on paper towels to catch the extra oil. These chips were so much fun to make, and the kids loved that we did it ourselves. And for all you concerned moms out there, we did serve vegetables!
Snap! Crackle! POPCORN
After dinner is when we really started having fun. This year, I had time in advance to prepare for our corporate goody day! Everyone loves popcorn, so that's what we went with. You'll hear a lot about how Pinterest has expanded my cooking and crafting world. I found a Pin with six amazing sounding sweet popcorn recipes and picked two (links to the recipes below:
1. Cinnamon bun popcorn (cinnamon caramel corn with pecans and white chocolate) via Our Best Bites
 This was absolutely INCREDIBLE. It really tastes like it sounds. The caramel was also a fun experiment for the kids, too. They watched
  as we added sugar, cinnamon, corn syrup, butter, and vanilla to the pan and brought the mix up to a boil. Since we did a small batch, it was hard to test it with the candy thermometer, but I was able to show them with a glass of cold water the difference between the soft crack and the hard crack stage of sugary candies. They want me to make it again! I may have to make the cinnamon caramel as a stand-alone, it was soooo good!
3. Popcorn brittle (caramel, M&M’s & peanuts) via Simple and Delicious.

 This recipe was also delicious, and much crunchier than the cinnamon bun version. We love the seasonal m&ms in it. I bet this would be beautiful with any of the holiday colors. I'm thinking the Easter pastel m&ms in spring would be very cool...
Both recipes were a huge hit at both the birthday party AND the goody day!
The Title Track - Ginger Snappin!
I may have the best husband ever. While I was fussing with the caramels, Chris was whipping up a batch of gluten free gingersnap dough. As promised by the recipe, this was the least fussy GF dough I've worked with yet. Thanks this time to the Gluten Free Goddess!
The plan for these crispy, tasty treats was to use them as spicy "chips" in the chocolate chip cheesecake dip recipe that I found on, you guessed it, Pinterest! (Are you sensing a theme here?) Well, the cheesecake dip recipe suggested using Teddy Grahams, but Teddy Grahams aren't gluten free, and just don't have that holiday SNAP I was looking for. Our answer to Teddy Grahams...... Ginger Snap Bears!
A couple of years ago, I bought tiny cookie cutters for making fun shapes in our bento box lunches. It turns out that they're just the perfect size for bite sized cookies too! These truly were the perfect cookies for that cheesecake dip, but they were also pretty darned good all by themselves. I may have a few more; we made an army of them!
Chips in the Head
I had really been craving potato chips for weeks, but in the spirit of teaching the kids healthy choices, we seldom buy them. It turned out we had a few lonely potatoes, so I decided to go ahead and feed my craving while having and adventure with the kids. Homemade potato chips, here we come! Chris seasoned chicken legs and thighs and baked them in the oven at 350 degrees for about an hour and a half. While the chicken was baking,
 he prepped potatoes for me by washing them thoroughly and using my daughter's mandolin to very thinly slice the potatoes. The sliced potatoes went into a big bowl of water to prevent browning. I understand that it leaches some of the nutrients from the potatoes, but it was worth it for the pretty color on this rare treat.
He didn't feel like he was having good success with the finest setting on the mandolin, so he used the next step up. I would say use the finest setting even if some of the slices shred. The thicker they are, the faster they get soggy.
The next step was heating the oil. We used what we had in the house, which was a combination of best blend, canola, and olive oils. You need at least two inches of oil so the slices have room to move around.
When you add the potato slices, the oil fizzes way up, so don't use a pan that you have to fill too full or you'll have a mess on your hands. The slices will curl up on the edges, but they won't be really crispy until they turn golden brown. We did not use any kind of chemicals to keep the chips "white" during frying, so ours were very golden.
Toss the still hot chips with whatever seasoning you prefer and set them aside to cool in single layer on paper towels to catch the extra oil. These chips were so much fun to make, and the kids loved that we did it ourselves. And for all you concerned moms out there, we did serve vegetables!

Snap! Crackle! POPCORN
After dinner is when we really started having fun. This year, I had time in advance to prepare for our corporate goody day! Everyone loves popcorn, so that's what we went with. You'll hear a lot about how Pinterest has expanded my cooking and crafting world. I found a Pin with six amazing sounding sweet popcorn recipes and picked two (links to the recipes below:
1. Cinnamon bun popcorn (cinnamon caramel corn with pecans and white chocolate) via Our Best Bites
 This was absolutely INCREDIBLE. It really tastes like it sounds. The caramel was also a fun experiment for the kids, too. They watched
  as we added sugar, cinnamon, corn syrup, butter, and vanilla to the pan and brought the mix up to a boil. Since we did a small batch, it was hard to test it with the candy thermometer, but I was able to show them with a glass of cold water the difference between the soft crack and the hard crack stage of sugary candies. They want me to make it again! I may have to make the cinnamon caramel as a stand-alone, it was soooo good!
3. Popcorn brittle (caramel, M&M’s & peanuts) via Simple and Delicious.

 This recipe was also delicious, and much crunchier than the cinnamon bun version. We love the seasonal m&ms in it. I bet this would be beautiful with any of the holiday colors. I'm thinking the Easter pastel m&ms in spring would be very cool...
Both recipes were a huge hit at both the birthday party AND the goody day!
The Title Track - Ginger Snappin!
I may have the best husband ever. While I was fussing with the caramels, Chris was whipping up a batch of gluten free gingersnap dough. As promised by the recipe, this was the least fussy GF dough I've worked with yet. Thanks this time to the Gluten Free Goddess!
The plan for these crispy, tasty treats was to use them as spicy "chips"
 in the chocolate chip cheesecake dip recipe that I found on, you guessed it, Pinterest! (Are you sensing a theme here?) Well, the cheesecake dip recipe suggested using Teddy Grahams, but Teddy Grahams aren't gluten free, and just don't have that holiday SNAP I was looking for. Our answer to Teddy Grahams...... Ginger Snap Bears!
A couple of years ago, I bought tiny cookie cutters for making fun shapes in our bento box lunches. It turns out that they're just the perfect size for bite sized cookies too! These truly were the perfect cookies for that cheesecake dip, but they were also pretty darned good all by themselves. I may have a few more; we made an army of them!

Monday, December 12, 2011
A Craft a Day...
There was a time when I worked on making something almost every day. Don't get me wrong, I'm not talking about huge, extravagant productions. But I did have several projects going and a little time to work on them. The last 6 months have been strangely barren of crafting. There has been no pearl designing and knotting with my bestie at a coffee shop; no knitting or crocheting with my buddies in the cafeteria at church; no card making with kids; no new hats, scarves, blankets, clay creations, pictures, cozies, or grape vine wreaths.
This isn't working well for me, and it's time for a change. Enter Pinterest!
One of my Besties "strongly suggested" that I join Pinterest, and after months of ignoring, refusing, kicking, and screaming, I did. She's persistent that way. :-) You can now find me there: http://pinterest.com/mdragan42/. Despite insisting that I don't have time for another crafty website, I have to admit, that Pinterest has ended my crafting dry spell:
The Kansas Tea Party - Around and Around
One very cool craft that I found on a friend's Pinterest account is the very giftable Tea Wreath. I especially love this craft because I already had all of the supplies!
 Supplies:
Cardboard
Scrapbook Paper (or other pretty paper)
Coordinating Paper (or magazines)
Clothes Pins
Ribbon
Low Temp Glue Gun and Sticks
Mono-adhesive (optional)
Make a wreath shape out of cardboard, with the wreath part about the width of a clothespin. Using low temp glue, cover the wreath in scrapbook or other pretty paper. Cut strips of coordinating paper or magazine pictures the length and width to cover one surface of your clothes pins. Using mono-adhesive or low temp glue, cover one surface of each clothes pin with a strip of coordinating paper. Use low temp glue to attach clothespins evenly around the covered wreath, with the front of the clothespin facing OUT (to hold the tea bags). Attach coordinating ribbon to form a hanger for your wreath. Finally, slide a nice, individually wrapped tea bag into each clip to finish the look. 16 - 20 standard sized clips seems to be about the right number for a wreath.
Tinsel Town or Don't Sweater the Small Stuff
Tis the season for festive, holiday cheer, lots of eating, and of course, those ugly holiday sweater contests. My husband and I thought we had it made with our entries at our December Herbalife leadership training, but shockingly, were truly and honestly beat by an even greater atrocity to sweater-dom. Still, I gave it my best shot, and there's still the company contest this week:
 For your viewing pleasure, I present you with a homemade XL sweater vest made from sparkly red and black yarn (thanks, Mom!). For added glam, I've attached a fringe of tinsel, tinsel draped glitter snowflakes, and glittered foam "Christmas lights" strung on green and yellow ribbon. Perhaps despite the liberal use of tinsel and glitter, it's just too well organized to be an "ugly" sweater. Who knew?
Now that I'm moving forward with crafting again, the flood gates have opened! I have LOTS of ideas that must be tried, and soon. Can't wait!
This isn't working well for me, and it's time for a change. Enter Pinterest!
One of my Besties "strongly suggested" that I join Pinterest, and after months of ignoring, refusing, kicking, and screaming, I did. She's persistent that way. :-) You can now find me there: http://pinterest.com/mdragan42/. Despite insisting that I don't have time for another crafty website, I have to admit, that Pinterest has ended my crafting dry spell:
The Kansas Tea Party - Around and Around
One very cool craft that I found on a friend's Pinterest account is the very giftable Tea Wreath. I especially love this craft because I already had all of the supplies!
Supplies:Cardboard
Scrapbook Paper (or other pretty paper)
Coordinating Paper (or magazines)
Clothes Pins
Ribbon
Low Temp Glue Gun and Sticks
Mono-adhesive (optional)
Make a wreath shape out of cardboard, with the wreath part about the width of a clothespin. Using low temp glue, cover the wreath in scrapbook or other pretty paper. Cut strips of coordinating paper or magazine pictures the length and width to cover one surface of your clothes pins. Using mono-adhesive or low temp glue, cover one surface of each clothes pin with a strip of coordinating paper. Use low temp glue to attach clothespins evenly around the covered wreath, with the front of the clothespin facing OUT (to hold the tea bags). Attach coordinating ribbon to form a hanger for your wreath. Finally, slide a nice, individually wrapped tea bag into each clip to finish the look. 16 - 20 standard sized clips seems to be about the right number for a wreath.
Tinsel Town or Don't Sweater the Small Stuff
Tis the season for festive, holiday cheer, lots of eating, and of course, those ugly holiday sweater contests. My husband and I thought we had it made with our entries at our December Herbalife leadership training, but shockingly, were truly and honestly beat by an even greater atrocity to sweater-dom. Still, I gave it my best shot, and there's still the company contest this week:
For your viewing pleasure, I present you with a homemade XL sweater vest made from sparkly red and black yarn (thanks, Mom!). For added glam, I've attached a fringe of tinsel, tinsel draped glitter snowflakes, and glittered foam "Christmas lights" strung on green and yellow ribbon. Perhaps despite the liberal use of tinsel and glitter, it's just too well organized to be an "ugly" sweater. Who knew?Now that I'm moving forward with crafting again, the flood gates have opened! I have LOTS of ideas that must be tried, and soon. Can't wait!
Playing Catch Up - Or Around the Kitchen in 20 Days
I've been thinking about how incredibly busy we've been this year and how much I miss cooking, canning, and crafting with my best friends. It occurred to me that I HAVE been doing some of those things I miss, and that NOW is a great time to reflect on them.
November - Tomato Love (a Canning Story)

My best friend came in to 3 boxes of tomatoes from our favorite farmer at the end of November, and I FINALLY had some time to can with her. We have a pretty slick system worked out, and it only took us a few hours to prep and can 12 quarts of crushed tomatoes. There is nothing so wonderful as opening a jar of local tomatoes and tasting their freshness in the dead of winter! Sunshine in a jar!
Invasion of the Body Snatchers - Holy Cow What a Squash!
While we were canning, HeatherAnne gave me the largest Hubbard squash I've ever seen. My husband posted pictures on Facebook, and we were rewarded with lots of hilarious guesses as to which body was snatched!
 Fortunately, we are all safe, and none of us have been replaced by pod people (we think). This massive member of the squash family got chopped into eight still huge pieces and roasted until soft. The sections went into the freezer until I had time to make them into...
I Love love love my manual pasta press for creating really consistent noodles. Since these are a denser, whole grain noodle, I would only run them to a level 4 or 5 on the machine (thicker noodles). I then cut them using the large linguini (wide), cutting guard. A simple dowel rack is perfect for hanging the noodles out to dry. These noodles cook best if they have an hour or so to dry. They also freeze very well.
November - Tomato Love (a Canning Story)
My best friend came in to 3 boxes of tomatoes from our favorite farmer at the end of November, and I FINALLY had some time to can with her. We have a pretty slick system worked out, and it only took us a few hours to prep and can 12 quarts of crushed tomatoes. There is nothing so wonderful as opening a jar of local tomatoes and tasting their freshness in the dead of winter! Sunshine in a jar!
Invasion of the Body Snatchers - Holy Cow What a Squash!
While we were canning, HeatherAnne gave me the largest Hubbard squash I've ever seen. My husband posted pictures on Facebook, and we were rewarded with lots of hilarious guesses as to which body was snatched!
Fortunately, we are all safe, and none of us have been replaced by pod people (we think). This massive member of the squash family got chopped into eight still huge pieces and roasted until soft. The sections went into the freezer until I had time to make them into...Creamy Winter Squash Soup
(served 6)
6 Cups finely pureed winter squash
3 Cups skim milk or fat free condensed milk
2 Scoops Herbalife Vanilla Protein Drink Mix (optional)
2 tsp Cinnamon
1 tsp Nutmeg
1/2 tsp Ginger
1 Clove (crushed)
3 Allspice (crushed)
4 Cardamom pods (crushed)
I achieved the pureed winter squash by scraping the roasted winter squash into a dutch oven or stock pot with a little water and heating it until it "squished" under the spoon. At that point, the fully cooked squash went into the blender where it was thoroughly pureed.
Place all ingredients in a large saucepan and heat through, allowing the spices to blend into the body of the soup for 20-30 minutes. The Herbalife Protein Drink Mix added 15 grams of protein to the soup, making it a more complete meal for a cold, winter night. My family DEVOURED this soup and begged for more!
Save Some Room For Later - Future Squash Love
One of the really great things about that giant Hubbard, is that even after making soup for our large family, there was still a full dutch oven of pureed squash. All of the extra puree was slowly simmered until it was reduced to a thick paste. That thick paste is in the freezer, waiting to make... You guessed it! Squash Pies! Recipe to come...
You Can Never Have Too Many Noodles - Hanging Out
A couple of weeks ago, I felt a cold coming on, so I worked from home, took my Herbalife Best Defense (10x stronger than Airborne), and decided that Turkey Noodle Soup was just what I needed to boost my immunity and my spirits. It was just after Thanksgiving, so we had a beautiful, simple, homemade turkey broth, loads of leftover turkey, and a ton of leftover veggies from our feast. The only thing we lacked were noodles. As a Celiac, my noodle options are growing (if I want to spend an arm and a leg), but still limited. Besides, what could be better in homemade turkey soup than homemade whole grain gluten free noodles???

I used a basic egg noodle recipe, but substituted Sorghum flour for the all purpose flour, added a tablespoon of Xanthan Gum (available in most grocery stores). It's important to knead the dough well so the Xanthan Gum can bind thoroughly with the Sorghum flour.(served 6)
6 Cups finely pureed winter squash
3 Cups skim milk or fat free condensed milk
2 Scoops Herbalife Vanilla Protein Drink Mix (optional)
2 tsp Cinnamon
1 tsp Nutmeg
1/2 tsp Ginger
1 Clove (crushed)
3 Allspice (crushed)
4 Cardamom pods (crushed)
I achieved the pureed winter squash by scraping the roasted winter squash into a dutch oven or stock pot with a little water and heating it until it "squished" under the spoon. At that point, the fully cooked squash went into the blender where it was thoroughly pureed.
Place all ingredients in a large saucepan and heat through, allowing the spices to blend into the body of the soup for 20-30 minutes. The Herbalife Protein Drink Mix added 15 grams of protein to the soup, making it a more complete meal for a cold, winter night. My family DEVOURED this soup and begged for more!
Save Some Room For Later - Future Squash Love
One of the really great things about that giant Hubbard, is that even after making soup for our large family, there was still a full dutch oven of pureed squash. All of the extra puree was slowly simmered until it was reduced to a thick paste. That thick paste is in the freezer, waiting to make... You guessed it! Squash Pies! Recipe to come...
You Can Never Have Too Many Noodles - Hanging Out
A couple of weeks ago, I felt a cold coming on, so I worked from home, took my Herbalife Best Defense (10x stronger than Airborne), and decided that Turkey Noodle Soup was just what I needed to boost my immunity and my spirits. It was just after Thanksgiving, so we had a beautiful, simple, homemade turkey broth, loads of leftover turkey, and a ton of leftover veggies from our feast. The only thing we lacked were noodles. As a Celiac, my noodle options are growing (if I want to spend an arm and a leg), but still limited. Besides, what could be better in homemade turkey soup than homemade whole grain gluten free noodles???
I Love love love my manual pasta press for creating really consistent noodles. Since these are a denser, whole grain noodle, I would only run them to a level 4 or 5 on the machine (thicker noodles). I then cut them using the large linguini (wide), cutting guard. A simple dowel rack is perfect for hanging the noodles out to dry. These noodles cook best if they have an hour or so to dry. They also freeze very well.
Homemade Turkey Noodle Soup
1 Onion (diced)
8 Cups turkey broth (or canned chicken broth)
2 Cups leftover turkey (chopped)
2 - 4 Cups leftover vegetables (corn, green beans, carrots, peas, etc)
1 Tbsp ground Sage
1 tsp garlic powder
1 tsp garlic salt
Salt and Pepper to taste
Egg Noodles
1 Onion (diced)
8 Cups turkey broth (or canned chicken broth)
2 Cups leftover turkey (chopped)
2 - 4 Cups leftover vegetables (corn, green beans, carrots, peas, etc)
1 Tbsp ground Sage
1 tsp garlic powder
1 tsp garlic salt
Salt and Pepper to taste
Egg Noodles
In a stock pot or dutch oven, heat the diced onion until softened, then add the broth. Add the chopped turkey and leftover vegetables, sage, garlic, salt and pepper. Let all of the flavors blend over low-med heat for up to 2 hours. 5-10 minutes before serving, add handfuls of dried noodles until you're happy with the soup to noodle ratio.
 The combination of protein, immune boosting garlic, and antibacterial sage worked wonders on my cold! This was also a HUGE hit with the family. Leftovers? Not for long!
The combination of protein, immune boosting garlic, and antibacterial sage worked wonders on my cold! This was also a HUGE hit with the family. Leftovers? Not for long!
Subscribe to:
Posts (Atom)